How to Take Lightning Photos
by Matthew Cole
How to Photograph Lightning
I've had a page on lightning photography posted for a couple of years now and as traffic has picked up on it I have noticed that many people are searching for "how to photograph lightning" or similar text snippets. I never actually tell how to take photos of lightning, so thought maybe I'd toss this page out here to explain it.
Photographing lightning is not all that hard. Your equipment needs are modest, the technical skills involved are those available to most reasonably competent amateurs and the main issue is one of luck and positioning. There's an old saying in photography that to get a good photograph you should "use f/8 and be there". This is actually pretty close to the advice I'm about to give.
The Extremely Short Version
In case you hadn't noticed, I'm verbose as hell. If you find wading through all this prose too excruciating, here's the short version of instructions for taking dark-sky lightning photos:
- Load your camera with ASA 100 film
- Go somewhere really dark where lightning is happening, preferably at a safe distance
- Put the camera on a tripod and compose your shot
- Attach a locking cable release
- Set the focus to infinity
- Set the f/stop to f/8
- Set the shutter speed to B
- Open the shutter for a while. Depending on how bright the area is, a while might be 15 seconds to a couple of minutes. A good compromise is 2 minutes or until lightning happens, whichever comes first.
- Repeat as necessary
You might want to keep track of what you do and compare the results to what you expected and adjust accordingly. Not that I ever do, mind you, but it's still a good idea!
The Extremely Long Version
It's all about Timing
The central quandary of photographing lightning is that the event you are trying to photograph is pretty brief and it is unknowable in advance precisely when and where it is going to happen. (Actually, that's not quite right; I can tell you with some certainty that it will happen while you're advancing the film and it'll be off to the right). You need to have your shutter open in advance so that it is open when the lightning occurs. You want to maximize the likelihood that your shutter will be open when the lightning occurs which means it is to your advantage to leave it open for a long time. You can only really do this when it is dark out, so to start with, most people try taking lightning photos at night in dark areas. Especially in rural areas at night you will probably be able to leave your shutter open for a minute or more at a time; at a minute per exposure, a 36-exposure roll of film will give you more than half an hour of open-shutter time during which, hopefully, some lightning will happen and you'll get a decent lightning shot. The exposure considerations for these sort of pictures are pretty straightforward.
In areas with higher ambient light, such as cities or before dark (or even full daylight), it is impractical to leave your shutter open for huge swaths of time. In these cases, you'll need to fire the shutter when lightning actually happens. This can be done by quick reflexes or by electronic devices; either one relies on the frequent repeating behaviour of lightning bolts to capture the image after the time lag to fire the camera has elapsed. The exposure considerations for high-ambient light situations are a little more nuanced than those for complete darkness, and I will discuss them below.
Equipment
Fancy equipment isn't really required. It is best if you have:
- a camera which you can manually focus to infinity and with a B shutter speed setting available for long exposures,
- a cable release to go with it to lock open your shutter for a period of time,
- and a tripod.
Not only is older gear perfectly suitable for nighttime lightning photography, it might actually be better in some respects; I've read references to some electronic shutter cameras having limitations on maximum shutter-open times even on B (Bulb) because the magnets in the electronic shutters overheat or the battery drain holding the shutter open is excessive. This won't happen with your old Canon TX or Rolleicord!
How about Lenses? Actually, most any old lens will do. On my Adventures with Lightning page I have posted photos taken with 28mm, 45mm and 55mm lenses on 35mm film and with a 75mm lens in a 6X6cm format. You could use wider than 28mm, though the lightning might get pretty thin unless it was really close, and you could certainly use longer than 55mm although I haven't. You don't need particularly fast lenses as I'm going to tell you stop them down a bit. You might ask about filters; I personally hardly ever use them, although occasionally I use a more or less clear UV filter (specifically a B+W KR 1.5 or Nikon L1Bc) if I think I'm going to get wet. I generally leave my lenses bare on the theory that I spent a heap o'money to get prime glass and I don't want to slap another couple of air/glass boundaries in the way to degrade optical performance unless there's a really good reason.
Films
I don't use exotic films either, unless you consider slide films exotic. I'm partial to the just-discontinued Kodak E100S or E100SW films but have shot plenty of Fuji Sensia, Astia, Provia and Kodak Kodachrome 64 and Elite 100 as well. What you might notice about these films is that they're none-too-speedy, all being ASA 64 or 100. You don't really want fast film for lightning photos as the central struggle in taking these photos is leaving the shutter open for a while. (In fact, old Kodachrome 25 was probably the ideal lightning photography film and a good argument could be made for Fuji Velvia at ASA 50 which picks you up a stop over the Astias, Sensias and E100s of the world). Using faster films means you can't leave the shutter open as long, plus they cost more, two strikes against them! I happen to like slide films because to my mind they are more predictable in their behaviour for exposure and color. In part this is because the mounted slide is the actual film from your camera whereas prints are another step, and a very subjective one, which introduces more variables to your final image. However, feel free to use print film if you're more comfortable with that but I'd still stick to the ASA 100 stuff.
OK, Now What?
Well now you need some lightning. There's a couple of approaches to this. One is to take it as it comes or as you stumble across it, which is my usual approach and is why years separate my lightning photos on my Adventures with Lightning page. The other is to go looking for lightning. This latter approach is favored by a small but growing community of stormchasers who go zooming around in filthy weather looking to get shots of cool storms. Some of them drive hundreds of miles doing this, eating rotten roadfood and poring over radar images, National Weather Service broadcasts and ham radios trying to get to (or next to) violent weather. Me, I'm content to stop by the side of the road, drive to downtown Minneapolis or go down to the lake, but that's been the extent of it. This sure hampers my output! Anyway, you need to decide how active you want to be in pursuing this stuff. One thing I would suggest is that if you want a pretty sure-fire target to get hit by lightning, try your local tv or radio towers. They are nice and tall, all-metal and well-grounded. I wouldn't stand at the end of a guywire or anything, but from a safe distance they ought to yield a pretty sure set of lightning hits to practice on.
The other thing you want is somewhere pretty dark. Remember that you want to be able to open your shutter for great swaths of time to allow lightning to occur in your photo. Really dark places make this much simpler to do.
Now for Exposure. With ASA 100 film, it is pretty much f/8 and be there. Oh, f/5.6 will work too, or f/11, but f/8 sounds about right. The f/stop will make a difference in how thick any given lightning stroke appears--at f/5.6, which is letting in twice the light of f/8, the lightning flash will appear somewhat thicker and whiter than at f/8. At f/11, which is letting in half the light of f/8, the same lightning stroke would appear somewhat thinner. (If f/stops are a source of confusion to you, as they are to many people, you might want to read my Tedious Explanation of the F/Stop page which is by far my most popular page). The other half of the exposure equation is the shutter speed; how long do you leave the shutter open? Well, if it's dark enough, leave it open until some lightning happens. That's what I did in the picture shown here. 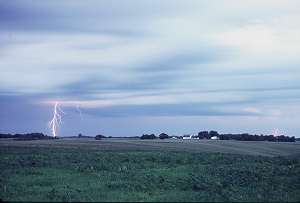 In this case, lightning was happening while I was travelling. I stopped the car, set up the camera (my Nikon FE with a 55mm f/2.8 lens and Kodachrome 64 film) on a tripod (a Gitzo 224) with a cable release (a lovely Minolta unit from 1980, not that it's important) and spent most of an hour clicking away. The lightning was consistent but sporadic and frankly I no longer remember the exposure times. I would open the shutter and if nothing happened in a couple of minutes, I would close it, advance the film, and open up again. A couple of times I asked my fiancé (now wife) to tell me when to close it. It was pretty frivolous. If nice lightning happened, I'd close down and advance and try again. Inevitably, one nice flash happened as I advanced the film. D'oh! I plugged through 40 frames this way and got three nice ones and then it got kind of boring and dark so we packed up and moved on.
When the slides came back I was very pleased with the results. There had been enough ambient light so that the clouds burned in and the foreground illuminated over the 30 seconds to 2 minutes that the shutter would remain open. There was some variance in how bright this was depending on the actual exposure time (all unrecorded) and also because it turns out the diaphragm in the 55mm lens was getting sticky and not always closing down all the way. I'd be more deliberate now in picking my exposure now but hey, it worked!
That, then, is the basic lightning setup; lightning in a dark spot, camera, tripod, cable release, slow film, f/8 or so, wait until lightning happens, and a bit of luck. If it's not too dark, you can actually compose a bit (as I did here using the old rule of thirds idea though of course the lightning position was pure dumb luck) so that if something happens to work, the picture will look nice.
High Ambient Light lightning photos
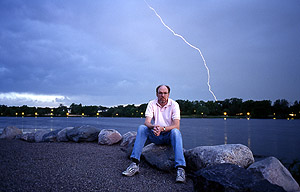
After taking a few photos in dark places you might decide it would be kind of nice to take some where you can see something other than yet another bolt of lightning. This actually took me hardly any time at all; my personal taste is for lightning to be one part of a larger composition, not the main subject alone. In the photo above I was fortunate to shoot in a situation where the traditional leave-it-open exposure method resulted in an illuminated scene. I was very pleased with this, thought, there, that wasn't so hard, and decided that I was more or less done with lightning photography.
Years later (1999), I read about an intriguing device; Stepping Stone Products' Lightning Trigger. This device detects lighting in daylight and fires the camera to take a picture. Now remember, we need to have the shutter open when lightning happens. Assuming that some combination of quick-firing the camera and repeat-stroking of the lighting overlaps, you can get daylight lightning photos. I hadn't given lightning photography much thought in a dozen years, but this was really intriguing and it set me to thinking about the issues involved.
The Quandary Compounded
As I mentioned earlier, the fundamental quandary in getting lightning photos is having your shutter open when lightning happens. In dark areas at night, you increase the chances of this happening by leaving your shutter open for long periods of time (photographically speaking). In daylight, or in brightly lit areas, this gets much more difficult because you begin having to limit your exposure time so as not to overexpose the foreground. The brighter the ambient light, the more severe this constraint gets until in full daylight with ASA 100 film you can only leave the shutter open for 1/125th of a second at f/16. I can make 40 frames last most of an hour at a minute or more exposure each, but a whole roll of 36 frames won't last 10 seconds at 1/125th of a second and even most of that would be film-winding time, not exposure time.
What to do? One alternative is to really slow down the exposure. Now, I've never tried this, but you can buy 10, 13 and 20-stop neutral density filters. How about slapping one of those on? If your exposure is 1/125 at f/16, you can put on the 20-stop ND filter and go for 60 minutes at f/16 [the 10 stop would give you 4 seconds and the 13-stop 30 seconds]. That ought to get all the lightning! Trouble is, any lightning strokes are likely to be very very feeble or possibly invisible. A 20-stop ND filter is not far different from leaving the lens cap on! That's probably not going to do it (although if anyone takes a crack at this, I'd love to hear about it).
The other alternative is to fire the camera when the lightning happens. That's what the lighting trigger does. Some photographers also do this themselves, reacting as soon as they see a bolt and hoping to catch the repeat strokes. It can be done and I have to say I'm very impressed. Me, though, I'm too lazy, and I went with the lightning trigger idea. I'm also too cheap to cough up the $329 Stepping Stone Products wants and so instead built my own trigger to the design (and with the parts) of a friend of mine who is a great practical engineer. (And no, we are not publishing the design, so please don't ask). While soldering this puppy up I thought about the applications.
First of all, the daylight lightning photo was an attractive idea. The exposure challenge here is to slow the shutter speed down as much as possible to allow as many stroke repeats of the lightning bolt to happen. I do this with the slower films (and I thought Kodachrome 25 would have been perfect but Kodak discontinued it just as I got interested in this again), small f/stops and a tripod. So far, it hasn't been full sunny/sixteen bright out, so I get by with small f/stops and shutter speeds like 1/4 of a second. I still envision how this photo will look, and have at least a proof-of-concept (read: crappy) photo showing that it will capture lightning in broad daylight, but I don't have a good picture using it this way. Another application is in high-ambient-light (but not daylight) areas. Here I was particularly thinking of lit cityscapes at night. In that case, you are dealing with short exposure times which don't lend themselves to leaving the shutter open for ages. Now the challenge is similar to the daylight photos but actually somewhat easier; you have to expose for the main subject and just let the lightning expose itself.
[Sidebar: Yet another application for the lightning trigger is remote-firing the camera in daylight using an electronic flash. My buddy who designed this unit has fired the unit up to 400 yards away in broad daylight using a Honeywell Strobonar, ASA 100 GN of 180. I've done it out to about 100 ft. with a Vivitar 283 (GN 120) in the backyard.]
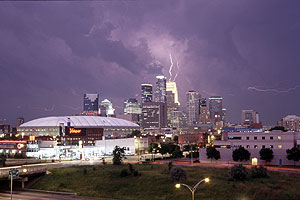 The photo at left is an example of a high ambient light shot. The same vital elements are here: camera (Contax G2 with 45mm f/2 lens and Kodak E100SW film) on a tripod (the same Gitzo 224) and a release (the homemade lightning trigger wired into a hacked Contax electronic release). In this case, the exposure for the overall scene was 4 seconds at f/4. [Sidebar: Wait, why not f/8? you ask...because the G2 only has manual shutter speed settings to 4 seconds. Using f/8 would have required 16 seconds. Even the beloved Nikon FE only goes to 8 seconds. So, in this situation, it was f/4 and be there]. I think it would have been nearly impossible to do this manually because the good lightning was so infrequent; in two hours, there were three really good lightning flashes over my chosen subject. I think it would have been extremely unlikely that anybody could have been adrenalin-hyped-hair-trigger ready to shoot for two hours and captured the good strokes. In my case, two were captured by the lightning trigger and one, predictably, was when I had disarmed it to fiddle with the camera. D'oh!
The Hard Part
It's not the technical stuff. If you understand your shutter speeds and f/stops and can follow the descriptions above you have grasped the fundamental technical aspects of taking lightning photos. It's not really that hard. Probably the only technical wrinkle I would caution about is that the long exposures might take you into regions where your film begins suffering reciprocity failure and you have to compensate by increasing the exposure. I'll leave it up to you to check on the characteristics of your chosen emulsion and adjust accordingly.
No, the hardest bit of taking lightning photos is Finding the Damn Lightning. A lot of lightning happens in the middle of the night, or while you're at work, or, it seems, during driving rainstorms. Nice, photogenic lightning happening around an attractive subject at a convenient time when it isn't pouring rain and you're in the mood is surprisingly rare. If you're just chomping to try this, it's probably worth going out on some drives when the good juicy thunderstorms are coming. If you're more patient, it is worth thinking about where you'd like to shoot and going there when the storms happen. My Minneapolis picture was like that; the lightning was better elsewhere, but that's the subject and position I wanted to try. Shooting like this you will get skunked sometimes and you'll come away with nothing. You'll throw out a bunch of lightning-free slides to get the good ones you want, but, if you want to know the dirty secret of professional photography, that's true of virtually all pro photographers no matter what they're shooting, so just chuck 'em happily away and feel like a pro.
Not Getting Killed
Lightning kills a couple of hundred people in the U.S. each year. Golfers get it, people in boats, climbers in mountains, kids playing soccer (though not, to my knowledge, people photographing lightning, yet). Generally, the smart thing to do when lightning is about is head to cover (though this is no guarantee; as I write this the local news showed a house up in Duluth hit and set afire by lightning. It was nearly a total loss which, if the Duluth Fire Department is anything like the Duluth Police, doesn't surprise me.) If you're taking lightning photos, you are doing the opposite, heading out into the path of the storm. You might get killed or injured. You may wish to update your will, make sure your life insurance is paid up and become an organ donor just in case there are some unburned bits left after you get hit. There are long-term physiological effects if you survive which are well-documented in an article in the August 2002 Discover magazine. Not to scare you off or anything, but you are taking a risk when you go out after these photographs and you want to weigh those risks yourself against the sheer spectacle of being close to these storms.
And with those cheerful thoughts, here are some links I like...
[Note: if you've read Adventures With Lightning, this is going to look pretty familiar!]
Some Lightning Utilities
- Three Hour Probability of Lightning for the North Central region. The colors indicate how likely lightning is to occur here in Minnesota, where I am. You can also get the same map for the Northeast, the Southeast, the Deep South (the NOAA calls it South Central, but that makes me think of a bad bit of LA), the Southwest, and the Northwest. It's not super-localized, and it's not like you'd say, hey, it's going to lightning in Montana, that's only 14 hours away, let's go!, but it is kind of interesing.
- Intellicast used to have a fast, elegant, simple effective radar display. Now it's all junked up with ads etc. but if you page down past the crap you'll still have radar for Minnesota or the Entire U.S. You can loop the images to see how storms are progressing. You can also root around and find your local map, if you want. Here are some examples; Boise, Atlanta, Denver, and Des Moines. You'll find that you can take the National Map and click on a state to get the closer view. I really like the uncluttered presentation of these radar maps.
- The Lightning Injury Research Program site from the University of Illinois at Chicago is nicely done. Dr. Mary Ann Cooper has a good overview of the physical effects and in one bit I like charmingly describes people as "bags of electrolytes". She does say that lightning accounts for 27% of storm deaths annually, second only to hurricanes at 31%. There is also a National Lightning Safety Institute concerned with both individual and property safety.
- I already mentioned the excellent August 2002 Discover magazine article on the physiological effects of lightning strikes on humans (and, in the actual magazine, at least one photo of the injuries from a lightning hit) but it's worth a reminder. You might read this before you go out next time. Unfortunately, I can't link directly to it but follow the Recent Issues choice, take the 2002 Issues and go to August.
- Kids get hit too. Take a look at Lightning Safety for Kids by a girl who got hit.
- Didn't take enough care? Got hit? It is possible to live if you can your breathing going again. Then you can call up the Lightning Strike & Electric Shock Survivors International, a support group for those who survive getting hit by lightning.
- Well we're not giving away any lightning trigger circuits but you can find a couple at Forrest Cook's FC's Electronic Circuits page and also at Klaus Bagschik's site, Klaus's coming from Germany. I like Klaus's comment that once he built his unit the lightning started staying away. This parallels my experience! Both of these guys are using LM324s, but my unit also tosses in a 555 to keep the LEDs lit and the camera contact made and basically just cascades the four stages with the pot over one of them. If you look at these circuits and are confused then you'd be no better off with the one I use, so go wild.
Good Lightning Photography Sites:
- Joseph Matthews' site has superb lightning photographs from around the U.S. Many sites have tons of repetitive photos of bolts of lightning with no context; Matthews' gallery has beautiful shots of lightning in some sort of context, which he (and I) think is important. Whenever I revisit his site I am again impressed and think it's the collection of photos I'd most like to emulate. Some of his photos date back to the early 1970s, so Matthews has been at it a long time, and his "How to Photograph Lightning" section is really well-done. He's even got some daylight shots. The only thing I'd add to his equipment list is a shower cap, good for quickly bagging the camera to make it waterproof when the rain starts. This site is well worth going through.
- Robert Chavez's site has beautiful shots of lightning in the desert. I think they get more photogenic dry crackly lightning down there than we get up here in the Midwest, where the lightning comes in big fast-moving fronts with lots of rain. Anyway, check out this site for some great shots.
- Stepping Stone Products makes the Lightning Trigger, which will fire your camera when lightning happens in front of it, making daytime lightning photos easier. The product is intriguing and many of the photos they show in their gallery are impressive. Of course, they are mostly photogenic crackly dry desert lightning photos.
- Chuck Doswell's site has a decent How To section and some nice lightning shots. He has sensible notes about Safety ("You won't hear the one that gets you") and one of the few daylight shots not on the Lightning Trigger's site. He goes for the tradional lightning photography black background.
- Photo Pixels has some excellent lightning shots around Minneapolis. I think I know the building these folks live in judging by the number of shots of Lake Calhoun. Lucky devils get to take lightning pics from their porch while I'm out getting drenched!
- West Virginia Lightning has a sensible How To section and the obligatory black background.
- Links to a bunch of photographers' sites, both good and otherwise. It saves me from having to post them all.
Matthew Cole is an amateur photographer in Saint Paul, Minnesota. This is the usual space to say that you, in the third person, are world-famous, highly-acclaimed, award-winning, internationally-recognized, etc. but in fact I'm just an insurance company analyst who plays with cameras for fun and have done so since 1972. [His Fame Spans the Centuries!!, er, no, maybe not] I am not primarily a Lightning Photographer. I mostly take pictures of my family, occasionally take a crack at lightning and like hanging cameras off kites. I write portions of this website as the fancy strikes me and enjoy the occasional correspondence with people who like it. I hope you have as much fun with photography, family and life as I do. Be careful out there.
e mail me
 In this case, lightning was happening while I was travelling. I stopped the car, set up the camera (my Nikon FE with a 55mm f/2.8 lens and Kodachrome 64 film) on a tripod (a Gitzo 224) with a cable release (a lovely Minolta unit from 1980, not that it's important) and spent most of an hour clicking away. The lightning was consistent but sporadic and frankly I no longer remember the exposure times. I would open the shutter and if nothing happened in a couple of minutes, I would close it, advance the film, and open up again. A couple of times I asked my fiancé (now wife) to tell me when to close it. It was pretty frivolous. If nice lightning happened, I'd close down and advance and try again. Inevitably, one nice flash happened as I advanced the film. D'oh! I plugged through 40 frames this way and got three nice ones and then it got kind of boring and dark so we packed up and moved on.
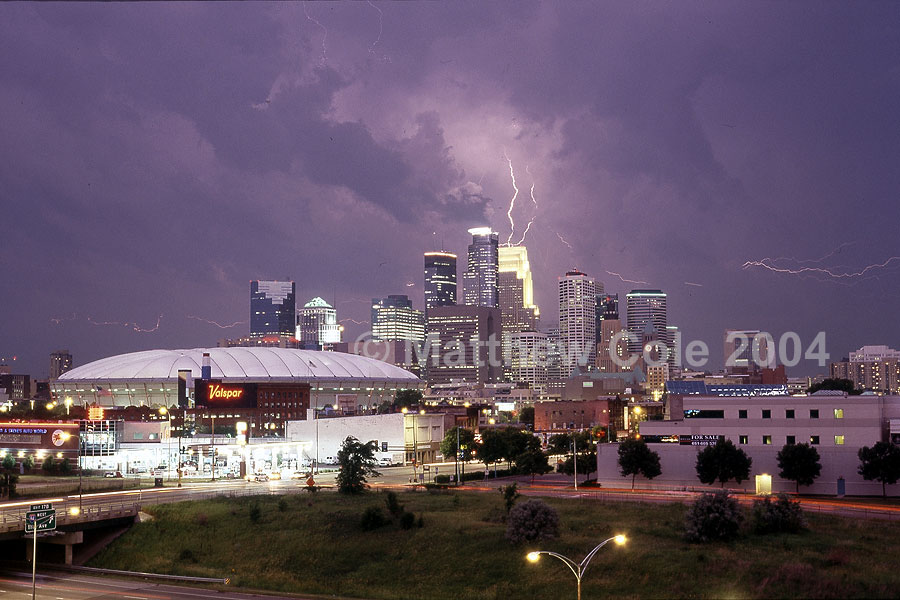
